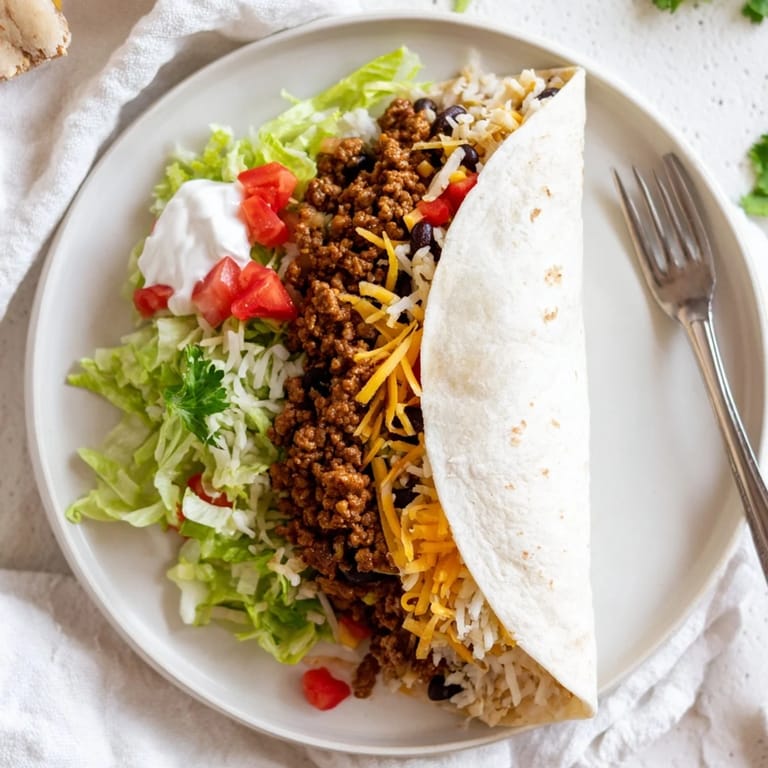
 Save to Pinterest
 The smell of cumin and chili powder hitting hot oil still takes me back to my first apartment kitchen, where I learned that a truly great burrito comes down to the filling's seasoning depth. I used to think just dumping taco seasoning on ground beef was enough, but one bite of my neighbor Maria's homemade version changed everything. She taught me that building flavors in layers—onion first, then garlic, then spices—makes all the difference. Now it is the only way I make them.
Last winter my roommate came home sick and I made a double batch, wrapping them individually in foil. She ate one every night that week and swore the spices helped her congestion. Now whenever someone needs a comfort meal, this is what I show up with, wrapped and ready to warm.
Ingredients
- 1 lb (450 g) ground beef: I prefer 85/15 ratio for the best balance of flavor and moisture, but 80/20 works if you drain the excess fat
- 1 tbsp olive oil: Helps bloom the spices and keeps the onion from sticking as it softens
- 1 small onion, finely chopped: Yellow onion melts into the filling better than white, which can stay too crunchy
- 2 cloves garlic, minced: Fresh garlic is non negotiable here—jarred garlic has an off taste that shows through
- 1 tsp ground cumin: The backbone of the flavor profile, use fresh cumin that smells aromatic when you open the jar
- 1 tsp chili powder: Mild chili powder gives color and subtle heat without overpowering other spices
- 1/2 tsp smoked paprika: This adds a subtle smoky depth that makes the beef taste like it cooked over a fire
- 1/2 tsp dried oregano: Mexican oregano has a more earthy flavor but regular works perfectly fine
- 1/2 tsp salt: Enhances all the other spices and brings the beef's natural flavor forward
- 1/4 tsp black pepper: Freshly cracked pepper adds a bright heat that balances the rich beef
- 2 tbsp tomato paste: Concentrated tomato flavor creates a velvety sauce that clings to every bite of beef
- 1/3 cup (80 ml) water: Thins the tomato paste just enough to coat the meat without making it soupy
- 1 cup (180 g) cooked white or brown rice: Day old rice works best and prevents the burrito from becoming soggy
- 1 cup (170 g) canned black beans, drained and rinsed: Rinsing removes the canning liquid that can make everything taste metallic
- 1 1/2 cups (150 g) shredded cheddar or Monterey Jack cheese: A blend of both gives you sharp flavor and perfect melt
- 1 cup (100 g) shredded lettuce: Iceberg stays crisp longest but romaine adds more nutrition
- 1 medium tomato, diced: Vine ripened tomatoes have the most flavor and hold their texture better
- 1/2 cup (120 ml) sour cream: Full fat sour cream adds a cool contrast to the spiced beef
- 1/3 cup (30 g) chopped fresh cilantro: Cilantro haters can leave it out but it adds brightness that cuts through the rich filling
- 4 large (10-12 inch/25-30 cm) flour tortillas: Mission or similar brand tortillas fold without cracking and hold everything together
Tired of Takeout? 🥡
Get 10 meals you can make faster than delivery arrives. Seriously.
One email. No spam. Unsubscribe anytime.
Instructions
- Build the flavor foundation:
- Heat olive oil in a large skillet over medium heat until it shimmers. Add onion and cook for 2-3 minutes until softened and translucent. Add garlic and cook for 30 seconds until fragrant but not browned.
- Brown the beef:
- Add ground beef to the skillet, breaking it up with a wooden spoon. Cook for 5-6 minutes until browned all the way through, stirring occasionally to ensure even cooking.
- Wake up the spices:
- Stir in cumin, chili powder, smoked paprika, oregano, salt, and pepper. Cook for 1 minute, stirring constantly, until the spices become very fragrant.
- Create the sauce:
- Add tomato paste and water, stirring until the paste dissolves into the beef mixture. Simmer for 3-5 minutes until slightly thickened and the beef looks coated and glossy. Remove from heat.
- Warm the tortillas:
- Heat tortillas in a dry pan for 15-20 seconds per side or microwave them wrapped in damp paper towels for 30 seconds. Warm tortillas fold without cracking.
- Assemble the burritos:
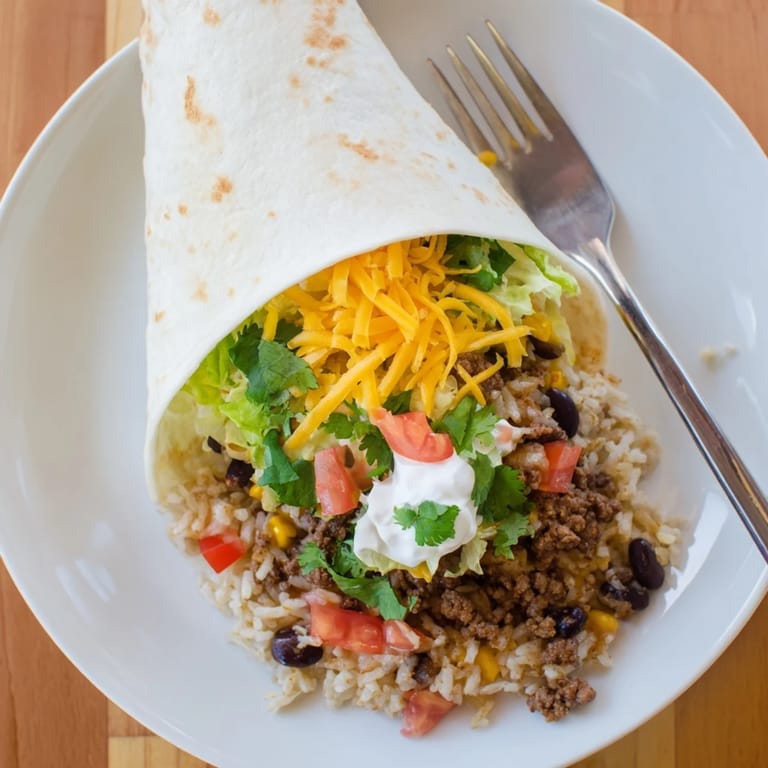
- Lay each tortilla flat on a cutting board. Layer with 1/4 each of rice, beans, beef mixture, cheese, lettuce, tomato, and a dollop of sour cream. Sprinkle with cilantro if using.
- Roll them tight:
- Fold in the sides about 1 1/2 inches, then roll up tightly from the bottom edge to enclose the filling completely. Place seam side down to keep them closed.
- Optional toast for crunch:
- For a crispy exterior, place burritos seam side down in a dry skillet over medium heat. Toast for 2 minutes until golden and slightly crisp.
 Save to Pinterest
 My now husband still talks about the burritos I made him on our third date. He says that is when he knew I could cook, though honestly I was just nervous and overcompensated with extra cheese.
Making Ahead
The beef filling keeps beautifully in the refrigerator for 4-5 days and actually tastes better the next day as the spices meld together. I often make a double batch on Sunday to use for burritos, taco salads, or even as a topping for loaded nachos during busy weeknights.
Customization Ideas
Sometimes I swap the rice for cauliflower rice when I want something lighter. My sister adds roasted sweet potatoes and a drizzle of chipotle crema for a variation that has become her signature version.
Storage And Reheating
Wrap assembled burritos individually in foil or plastic wrap and freeze for up to 3 months. To reheat, remove the foil, wrap loosely in a paper towel, and microwave for 2-3 minutes, flipping halfway through. For the best texture, finish them in a dry skillet for 1 minute per side to recrisp the tortilla.
- Never freeze burritos with lettuce or tomato added—put those in fresh after reheating
- Let frozen burritos thaw overnight in the refrigerator for the most even heating
- Reheat frozen burritos in a 350°F oven for 25-30 minutes if you have time
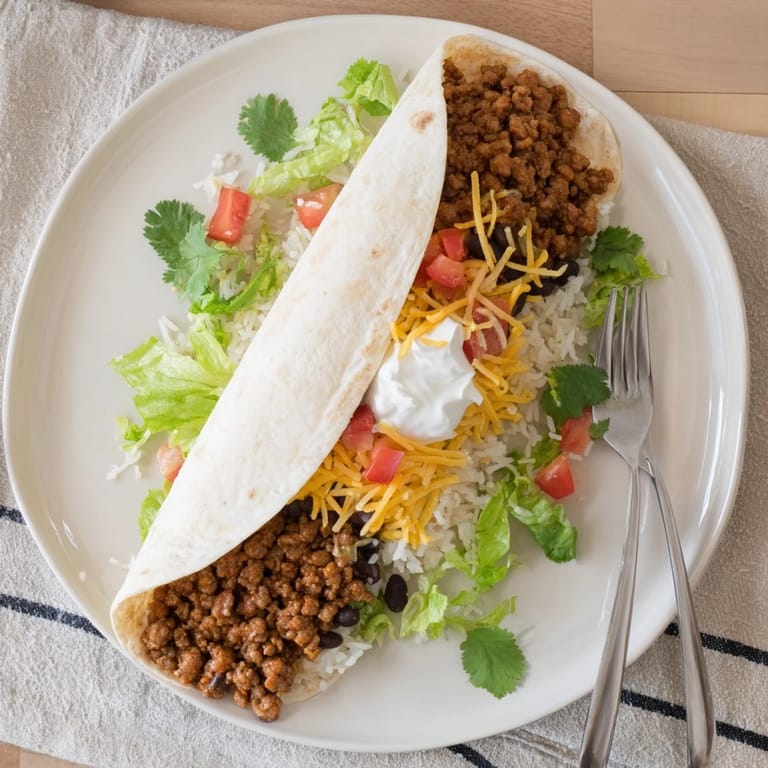 Save to Pinterest
 There is something deeply satisfying about wrapping a burrito tight, like you are tucking in a flavor bomb for later. Hope these become part of your regular rotation too.
Recipe Questions & Answers
- → How do I prevent my burritos from falling apart?
Warm your tortillas until pliable before filling, which makes them more flexible and less likely to tear. Don't overfill—leave about 2 inches of space around the edges. Fold in the sides first, then roll tightly from the bottom, tucking the filling in as you go. If needed, secure with toothpicks before toasting.
- → Can I make these burritos ahead of time?
Yes! Prepare the beef filling up to 2 days in advance and store it in the refrigerator. Warm it up before assembling. You can also assemble the burritos completely, wrap them tightly in foil, and refrigerate for up to 24 hours. When ready to eat, toast them in a dry skillet for 2-3 minutes per side or bake at 350°F for 10-15 minutes.
- → What's the best way to warm the tortillas?
Heat a dry skillet over medium-high heat and warm each tortilla for 15-20 seconds per side until pliable and slightly blistered. Alternatively, microwave tortillas wrapped in damp paper towels for 20-30 seconds. Warming makes them more flexible and prevents cracking when you roll them.
- → How can I make these burritos spicier?
Add diced jalapeños to the beef while cooking, or use hot sauce in the meat mixture. Increase the chili powder to 2 teaspoons or add 1/2 teaspoon of cayenne pepper. You can also serve with sliced fresh chilies, spicy salsa, or chipotle hot sauce for extra heat after assembling.
- → What sides go well with beef burritos?
Serve with guacamole and tortilla chips for a complete meal. A simple side salad dressed with lime vinaigrette balances the hearty burrito. Mexican rice or refried beans make excellent additions. For a lighter option, serve with fresh fruit like watermelon or pineapple to contrast with the rich filling.
- → Can I freeze these burritos?
Absolutely! Assemble the burritos completely, then wrap each tightly in plastic wrap followed by foil. Freeze for up to 3 months. To reheat, remove plastic wrap and bake frozen burritos at 400°F for 30-40 minutes, or microwave in 2-minute intervals until heated through.


